You are using an out of date browser. It may not display this or other websites correctly.
You should upgrade or use an alternative browser.
You should upgrade or use an alternative browser.
- Status
- Not open for further replies.
How to Set Up a Proxy by Yourself, Step-by-Step
1. Locate/choose the server you want to make your IPs on. The server needs to have CentOS version 7, 64 bit. Most server sites will have this option somewhere (Vultr is one example of this). Be sure to choose a server closest to where you trying to connect so that your proxies have top speed.
2. Now you have a server selected. Next, you need to head on over and download Putty from You do not have permission to view the full content of this post. Log in or register now.. This should not be downloaded on your server but on your own computer. This is the download that will allow you to connect to the CentOS server.
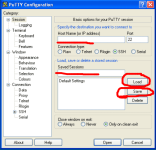
3. Once you have Putty downloaded, you're going to open it. In the “Hostname (or IP address)” box you're going to enter your server IP. The IP is commonly on the control panel on the site where you got your server. Sometimes it’s also emailed to you. Every server will have it in a slightly different spot so just look around for what looks like an IP.
4. After entering the IP, click “open” at the bottom (If a message comes up, click yes). Now you should be in the terminal box (looks black like a cmd box). It should say login and you want to type in the word root .

5. Next, you will be asked to enter a password. This also came with the server and should be somewhere around the IP. Once you see it, enter it into the terminal looking box like it asks (you may not see the password as your typing it, but it is still working). It may ask you to enter the password a second time which is no problem just do it; I find it better to type out then actually copy/paste.
6. Now, depending on your server, it may ask you for a new password. This can be whatever you like. If you don’t see anything related to making a new password then go to step 7.
7. Once you have made your password, if needed, you will officially be on your server. In the server, you will want to type yum install wget.
8. Wait for it to install. Then type in

9. Steps 10 and 11 can vary between servers, just keep an eye out for a number that looks like an IP. If it doesn’t ask for the username/password then just use the IP and the port.
10. You may be creating Username/password authenticated proxies so you will have to make a username to remember and then a password to remember (when you type it may seem like nothing is there but it is! So remember what you're typing!).
11. Now you made one proxy which is the same as other You do not have permission to view the full content of this post. Log in or register now. which offer a private proxy! It will be in the IP ort:username
 assword format when you enter it into the browser to use. The IP is whatever it tells you, the port is always 3128, and the username/password is what you made. You need the : to separate each part of the address also. So one random example that you enter into the browser for a proxy is 47.52.24.117:3128:username:expert10. The first being the IP, then the port, then the username, and finally the password.
12. Repeat process for more proxies!
1. Locate/choose the server you want to make your IPs on. The server needs to have CentOS version 7, 64 bit. Most server sites will have this option somewhere (Vultr is one example of this). Be sure to choose a server closest to where you trying to connect so that your proxies have top speed.
2. Now you have a server selected. Next, you need to head on over and download Putty from You do not have permission to view the full content of this post. Log in or register now.. This should not be downloaded on your server but on your own computer. This is the download that will allow you to connect to the CentOS server.
3. Once you have Putty downloaded, you're going to open it. In the “Hostname (or IP address)” box you're going to enter your server IP. The IP is commonly on the control panel on the site where you got your server. Sometimes it’s also emailed to you. Every server will have it in a slightly different spot so just look around for what looks like an IP.
4. After entering the IP, click “open” at the bottom (If a message comes up, click yes). Now you should be in the terminal box (looks black like a cmd box). It should say login and you want to type in the word root .

5. Next, you will be asked to enter a password. This also came with the server and should be somewhere around the IP. Once you see it, enter it into the terminal looking box like it asks (you may not see the password as your typing it, but it is still working). It may ask you to enter the password a second time which is no problem just do it; I find it better to type out then actually copy/paste.
6. Now, depending on your server, it may ask you for a new password. This can be whatever you like. If you don’t see anything related to making a new password then go to step 7.
7. Once you have made your password, if needed, you will officially be on your server. In the server, you will want to type yum install wget.
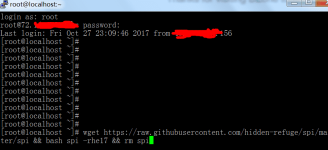
8. Wait for it to install. Then type in
wget You do not have permission to view the full content of this post. Log in or register now. && bash spi -rhe17 && rm spi

9. Steps 10 and 11 can vary between servers, just keep an eye out for a number that looks like an IP. If it doesn’t ask for the username/password then just use the IP and the port.
10. You may be creating Username/password authenticated proxies so you will have to make a username to remember and then a password to remember (when you type it may seem like nothing is there but it is! So remember what you're typing!).
11. Now you made one proxy which is the same as other You do not have permission to view the full content of this post. Log in or register now. which offer a private proxy! It will be in the IP
12. Repeat process for more proxies!
Attachments
-
You do not have permission to view the full content of this post. Log in or register now.
- Status
- Not open for further replies.
Similar threads
-
-
-
-
Help Pa help naman po meron po kayo *****ed version ng Midas Gen
- Started by lednarf214
- Replies: 1
-
Popular Tags
.ehi
.prx
7 days ssh
apn
bug
config
ehi
fast
free internet
free net
freenet
globe
globe & tm
globe and tm sim
gtm
hpi
http
http custom
http injector
injector
internet
mgc
no load
open tunnel
openvpn
ovpn
payload
phcorner
pisowifi
postern
premium
proxy
prx
psiphon
remote proxy
sg server
shadowsocks
skyvpn
smart
softether
sscap
ssh
sun
tm
tnt
trick
tricks
tutorial
vpn
wifi
About this Thread
-
2Replies
-
539Views
-
3Participants
Last reply from:
Lou Fin
Lou Fin
Online statistics
- Members online
- 1,220
- Guests online
- 3,632
- Total visitors
- 4,852