eReNz123456
Honorary Poster
- Joined
- May 12, 2015
- Posts
- 670
- Reaction
- 104
- Points
- 188
- Age
- 28
How to share a VPN connection over Wi-Fi on Windows 10
Want to share on Windows 10 a VPN connection over Wi-Fi with others? Just follow the steps below:
Step 1: Check on available networks
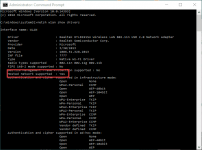
Make sure you have a wireless device running, such as a built in interface or an external USB wireless adapter. Also the respective device needs to support hosted networks. To check on the latter do as follows:
Step 2: Create and start a wireless hosted network
Think about how to name your shared network and what password you want people to enter when connecting to your connection: The SSID is the name your wireless network can be identified with, while the SSID key is the pass phrase (with at least 8 characters) you want users to type in.
To specify the credentials enter this command in the Command prompt window:
netsh wlan set hostednetwork mode=allow ssid=YourSSID key=YourPassphrase
Example:
netsh wlan set hostednetwork mode=allow ssid=ERENZ key=12345678
Please add your own SSID and key and press 'Enter'.
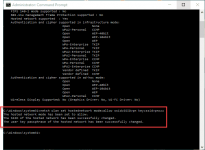
Activate the newly created hosted network by typing:
netsh wlan start hostednetwork
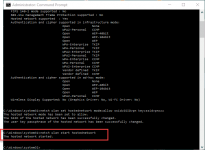
Step 3: Start your VPN
Step 4: Share your VPN Internet connection via the hosted network
After creating and starting your hosted network and establishing a VPN connection you need to bind the VPN connection to the hosted network and make it accessible to wireless capable devices. For that you use the 'Internet Connection Sharing' feature of the Windows 10 host system.
Now that your hosted network is created, activated and ready to be shared hand over the credentials to those you want to share your CyberGhost connection with and tell them to do the following:
Copy and Pasted from CyberVPN. Credits to them.
Want to share on Windows 10 a VPN connection over Wi-Fi with others? Just follow the steps below:
Step 1: Check on available networks
Make sure you have a wireless device running, such as a built in interface or an external USB wireless adapter. Also the respective device needs to support hosted networks. To check on the latter do as follows:
- Press the 'Windows' button on your keyboard and type in 'cmd'.
- Right click on the result list entry called 'Command Prompt' and choose the entry 'Run as administrator'
- In the command prompt window type in netsh wlan show driversand press 'Enter'. Depending on the result do the following:
- If the generated output says 'No wireless interface found' or similar you don't have a built in Wi-Fi card or haven't inserted your USB wireless adapter yet. Insert a card or an external adapter and repeat the test.
- If it shows 'Hosted network supported: No' your device doesn't apply to the minimum system requirements. Add a compatible card or adapter and repeat the test.
- If it shows 'Hosted network supported: Yes' you can continue with step 2.

Step 2: Create and start a wireless hosted network
Think about how to name your shared network and what password you want people to enter when connecting to your connection: The SSID is the name your wireless network can be identified with, while the SSID key is the pass phrase (with at least 8 characters) you want users to type in.
To specify the credentials enter this command in the Command prompt window:
netsh wlan set hostednetwork mode=allow ssid=YourSSID key=YourPassphrase
Example:
netsh wlan set hostednetwork mode=allow ssid=ERENZ key=12345678
Please add your own SSID and key and press 'Enter'.

Activate the newly created hosted network by typing:
netsh wlan start hostednetwork

Step 3: Start your VPN
Step 4: Share your VPN Internet connection via the hosted network
After creating and starting your hosted network and establishing a VPN connection you need to bind the VPN connection to the hosted network and make it accessible to wireless capable devices. For that you use the 'Internet Connection Sharing' feature of the Windows 10 host system.
- Press 'Windows + X' on your keyboard and select 'Change Adapter Options'.
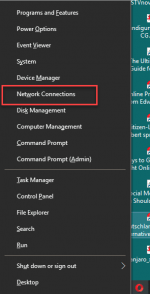
- Right click on the running and connected VPN Adapter (TAP Windows Adapter V9). DO NOT choose the new Microsoft Hosted Virtual Adapter with the SSID you just created.
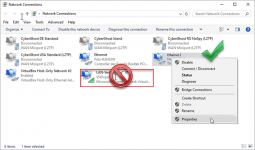
- Choose the entry 'Properties'.
- Click on the tab 'Sharing'.
- Activate the option 'Allow other network users to connect through this computer's Internet connection'.
- Choose the 'Microsoft Hosted Virtual Adapter' from the drop-down menu called 'Home networking connection'. It's usually labeled as 'LAN Connection* XX' whereas 'XX' responds to the number given to that network adapter, which has the SSID given to the hosted network created by you.
- Click 'OK' to finish.
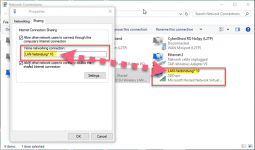
Step 5: Connect devices to your hosted networkIf you see just a text field (seems to be a Windows bug), close the 'Sharing' tab, click on 'OK' and repeat the sharing process.
Now that your hosted network is created, activated and ready to be shared hand over the credentials to those you want to share your CyberGhost connection with and tell them to do the following:
- Search for new networks on the respective device.
- Tap on the Wi-Fi network with the name given by you, in this example it's 'SSIDvpn'.
- Enter the password given to this network, in this example it's 'SSIDvpnxxx'.
- Tap on 'Connect'.
Copy and Pasted from CyberVPN. Credits to them.
Attachments
-
You do not have permission to view the full content of this post. Log in or register now.