J
Jeanh
Guest
VPN on Windows step by step guide (Using L2TP/IPsec VPN)
Here is the instruction how to connect to a VPN Gate Public VPN Relay Server by using L2TP/IPsec VPN Client which is built-in on Windows XP, 7, 8, 10, RT, Server 2003, 2008 and 2012.
1. Initial configurations (only once at the first time)
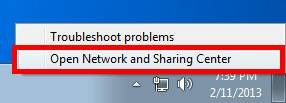
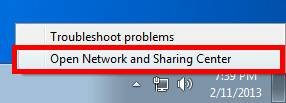
Right-click the network icon on the bottom-right side of Windows screen, and click "Open Network and Sharing Center" .
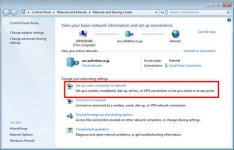
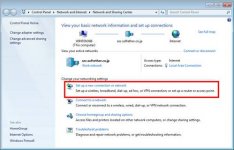
Click "Set up a new connection or network" on the "Network Sharing Center" .
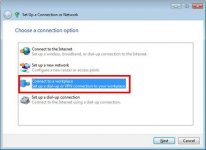
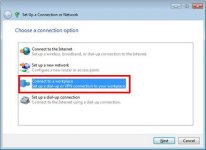
Select "Connect to a workplace" .
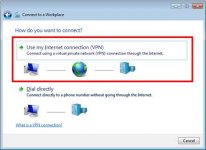
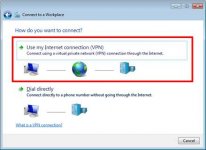
Select "Use my Internet connection (VPN)" .
Open the You do not have permission to view the full content of this post. Log in or register now. page and choose a VPN Server which you want to connect.
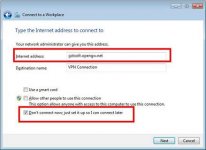
Copy the DDNS Hostname (an identifier ends with ".opengw.net" ) or IP Address (digits as xxx.xxx.xxx.xxx) and paste it on the "Internet address" field on the configuration wizard.
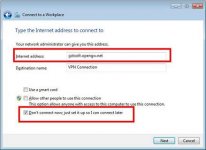
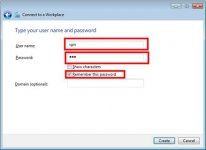
If the username and password prompting screen appears, input "vpn" (3-letters) on both username and password field. You should check "Remember this password" .
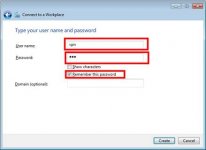
When "The connection is ready to use" message appears, click the "Close" button. Do not click the "Connect now" button.

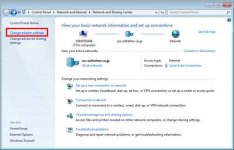
Go to "Network and Sharing Center" and click "Change adapter settings" .
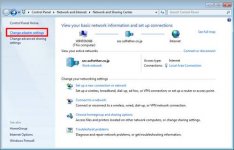
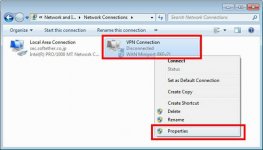
The currently defined VPN connection settings are listed. Right click the icon you created in the previous step, and click "Properties" .
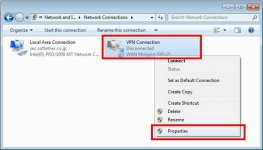
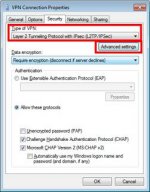
On the Properties screen, switch to the "Security" tab. (In Windows XP, switch to the "Network" tab.) Choose "Layer 2 Tunneling Protocol with IPsec (L2TP/IPSec)"on the "Type of VPN" drop-down list.
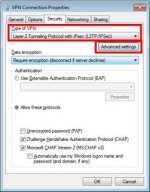
Next, click the "Advanced settings" button. (In Windows XP, click the "IPsec Settings" on the "Security" tab.)
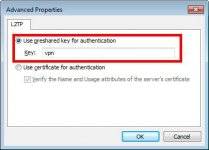
The following screen will appear. Click "Use preshared key for authentication" and input "vpn" (3-letters) on the "Key" field.
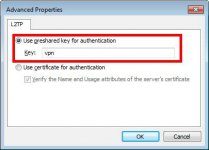
After the above configuration finished, click the "OK" button twice to close the property screen of the VPN connection setting.
2. Connect to the VPN Server
Double-click the created VPN connection setting, the below screen will appear.
"User name" and "Password" fields should be filled automatically if you enable password-saving options in previous steps. If not, input "vpn" on both "User name" and "Password" fields.

Click the "Connect" button to start the VPN connecting attempts.
While the VPN is trying to be established, the following screen displays statuses. If an error occurs, confirm your settings make sure that the type of VPN is "L2TP/IPsec" , and the pre-shared key is correctly specified.

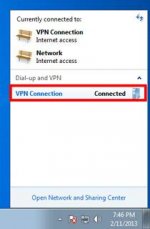
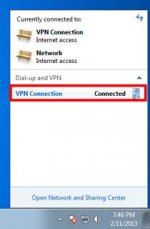
If the VPN connection is successfully established, a VPN connection icon will be listed on the screen which appears when you click the network icon on the bottom-right of Windows screen. The status of the VPN connection icon should be "Connected" .
By the way, you can initiate the VPN connection by simply clicking this VPN icon from now on.
3. Enjoy Internet via VPN relaying
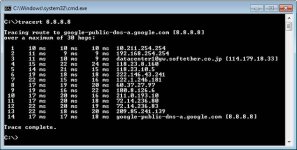
While VPN is established, all communications towards the Internet will be relayed via the VPN Server. You can verify that by using "tracert 8.8.8.8" command on the Windows Command Prompt.
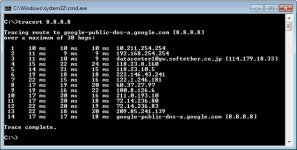
As the above figure, if the packet-path are through "10.211.254.254" , your communication is now relayed via one of VPN Gate Public VPN Servers.
You can also visit the You do not have permission to view the full content of this post. Log in or register now. to see your current global IP address. You can see your source country or region has been changed to other if you are connecting to a VPN server which is located on oversea country.

Enjoy YøùTùbé, Facebook or Twitter while your VPN connection is established.
Facebook, Twitter and Gmail uses HTTPS (SSL) encrypted communication protocols. Regardless of VPN or non-VPN, no one can tap these encrypted communications.
Here is the instruction how to connect to a VPN Gate Public VPN Relay Server by using L2TP/IPsec VPN Client which is built-in on Windows XP, 7, 8, 10, RT, Server 2003, 2008 and 2012.
- You do not have permission to view the full content of this post.
Log in or register now.
L2TP/IPsec Client configurations are difficult than SoftEther VPN Client.
If you are using Windows, using SoftEther VPN Client is recommended because it is very easy to configure and stable. SoftEther VPN Client can show the list of currently running VPN Gate Servers on the software screen.
1. Initial configurations (only once at the first time)
Right-click the network icon on the bottom-right side of Windows screen, and click "Open Network and Sharing Center" .

Click "Set up a new connection or network" on the "Network Sharing Center" .

Select "Connect to a workplace" .

Select "Use my Internet connection (VPN)" .

Open the You do not have permission to view the full content of this post. Log in or register now. page and choose a VPN Server which you want to connect.
Copy the DDNS Hostname (an identifier ends with ".opengw.net" ) or IP Address (digits as xxx.xxx.xxx.xxx) and paste it on the "Internet address" field on the configuration wizard.
- In general, DDNS Hostname (an identifier ends with ".opengw.net" ) are recommended to specify. DDNS hostname can continue to be used even if the corresponding IP address of the DDNS hostname will change in future. However, in some countries or regions, you might be unable to use DDNS hostname. If you fails to specify a DDNS hostname, try IP Address (digits as xxx.xxx.xxx.xxx) specification instead.

If the username and password prompting screen appears, input "vpn" (3-letters) on both username and password field. You should check "Remember this password" .

When "The connection is ready to use" message appears, click the "Close" button. Do not click the "Connect now" button.

Go to "Network and Sharing Center" and click "Change adapter settings" .

The currently defined VPN connection settings are listed. Right click the icon you created in the previous step, and click "Properties" .

On the Properties screen, switch to the "Security" tab. (In Windows XP, switch to the "Network" tab.) Choose "Layer 2 Tunneling Protocol with IPsec (L2TP/IPSec)"on the "Type of VPN" drop-down list.

Next, click the "Advanced settings" button. (In Windows XP, click the "IPsec Settings" on the "Security" tab.)
The following screen will appear. Click "Use preshared key for authentication" and input "vpn" (3-letters) on the "Key" field.

After the above configuration finished, click the "OK" button twice to close the property screen of the VPN connection setting.
2. Connect to the VPN Server
Double-click the created VPN connection setting, the below screen will appear.
"User name" and "Password" fields should be filled automatically if you enable password-saving options in previous steps. If not, input "vpn" on both "User name" and "Password" fields.

Click the "Connect" button to start the VPN connecting attempts.
While the VPN is trying to be established, the following screen displays statuses. If an error occurs, confirm your settings make sure that the type of VPN is "L2TP/IPsec" , and the pre-shared key is correctly specified.

If the VPN connection is successfully established, a VPN connection icon will be listed on the screen which appears when you click the network icon on the bottom-right of Windows screen. The status of the VPN connection icon should be "Connected" .
By the way, you can initiate the VPN connection by simply clicking this VPN icon from now on.

3. Enjoy Internet via VPN relaying
While VPN is established, all communications towards the Internet will be relayed via the VPN Server. You can verify that by using "tracert 8.8.8.8" command on the Windows Command Prompt.

As the above figure, if the packet-path are through "10.211.254.254" , your communication is now relayed via one of VPN Gate Public VPN Servers.
You can also visit the You do not have permission to view the full content of this post. Log in or register now. to see your current global IP address. You can see your source country or region has been changed to other if you are connecting to a VPN server which is located on oversea country.

Enjoy YøùTùbé, Facebook or Twitter while your VPN connection is established.
Facebook, Twitter and Gmail uses HTTPS (SSL) encrypted communication protocols. Regardless of VPN or non-VPN, no one can tap these encrypted communications.
Attachments
-
You do not have permission to view the full content of this post. Log in or register now.
