Y
Yours
Guest

With 40+ filters to choose from, Instagram’s gone a long way since its humble beginnings.
On the downside, the more filters they add the more cluttered Instagram’s interface becomes. When you think of it, it usually makes more sense to have only the filters at your disposal that you actually use regularly.
If you could tell Instagram to display only your fav filters, you’d declutter the UI and speed up postings.
Now, even though the app lacks a user-facing filter management in settings, power users who know where to look at will likely manage to locate this really useful feature.
Everyone else, welcome to today’s installment of iDownloadBlog’s tutorial series which will teach you how to quickly move your favorite Instagram filters around and hide those you don’t need from your view.
You can personalize your photo and video filters in the Instagram app by adding, hiding and rearranging the filters you see when posting a photo or video.
How to quickly reorganize Instagram filters
1) Launch Instagram on your iPhone.
2) Long-tap the camera icon at the bottom to quickly access your photo library.
3) Choose an image from the photo library on your device. Don’t worry, we’re not going to post anything—this step is needed only because we must get to Instagram’s filter carousel.

4) Tap Next to proceed to the filter selection screen.
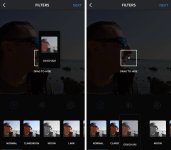
5) You will see the filters preview screen, with a larger preview of the currently selected filter occupying roughly two-thirds of the screen and smaller horizontally scrollable filter previews at the bottom. As you’ll quickly realize, swiping through dozens of filters can become really tiring.
- To move a filter to a different position—Tap and hold its preview image, drag it to a desired position and let go of the finger. You’re advised to move your top-used filters to the leftmost position so they’re immediately available without needing to swipe.
- To hide a filter—Tap and hold a filter’s preview image and then drag and drop it onto the square icon labeled “Drag To Hide” that appears as an overlay on the large preview image.

That’s it, boys and girls!
You now possess the power to move the filters around, prioritizing those you use most frequently and hiding the ones you seldom use.
But how exactly do you re-enable a hidden filter?
How to manage Instagram filters
1) Launch Instagram on your iPhone, long-tap the camera icon at the bottom, select an image from your library and tap Next to continue.
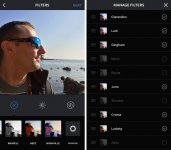
2) Swipe the filter previews all the way to the right, until you reach the end of your filters. You should see a button with a gear icon on it, labeled “Manage”. Tap it to continue.
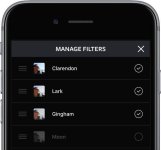
3) You’re now in Instagram’s filter management mode.

There, you can see the complete collection of Instagram’s filter, both the ones you have enabled and the ones that have been hidden from the view.
- To show a filter—Tick a checkbox at right.
- To hide a filter—Untick the box.
- To rearrange filters—To move a filter up or down the list, tap and hold its handle at the leftmost side, drag it to the position you’d like and let go of the finger.
As mentioned, moving the most frequently used filters to the top of the list will save you tons of swiping when posting photos and videos to Instagram.
Not satisfied with Instagram’s filters?
Instagram offers a rich selection of filters, each with its own style and appeal.
In my personal experience, more than half of Instagram’s filters are either dull and boring or too extreme for practical use. If all you want is make your snaps a bit warmer or brighter but without that Instagram-y look, built-in filters will actually get in your way.
If none of the Instagram image effects suit your needs, why not use a custom filter in your favorite image-editing app instead? Then, you could simply send an edited photo directly from your app to Instagram using iOS’s multi-purpose Share menu.
Signing off—and I’m sure you’re aware of this nifty trick, but here you go anyway: tap anywhere on your photo while playing with filters to quickly compare the photo before and after adding effects.
idownloadblog
Attachments
-
You do not have permission to view the full content of this post. Log in or register now.