Tutorial on how to:
Create free domain on Freenom + Connect them in cloudflare
Im also sharing my tips and tricks on:
Prerequisite:
Im using Firefox focus browser in this tutorial
1. Open your browser, then go to You do not have permission to view the full content of this post. Log in or register now.
copy city, region and postal code then paste to your notepad (If you're foreign, find PH server and connect to them to follow properly this tutorial)
2. Close tab (in Firefox Focus, tap the Trashbin icon), go to You do not have permission to view the full content of this post. Log in or register now. "remove ()"
3. Think about your domain you want to register, make them unique so you don't have any problem about domain availability check. Then type in textbox your desired domain plus [.ml/.ga/.gq/.cf/(.)tk]
For example: orange-ju.ml
Press enter on your keyboard
Then click "Checkout" button
(If the site doesn't respond after you click a button, refresh the page and wait till site completely finsh to load)
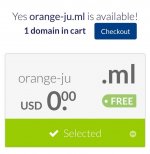
4. After clicking 'checkout', you'll be redirected to Freenom cart page.
On Domain Period selection: Select only 11 Month (my experience from using 12-month free subscription is when you overuse it, they will suspend your account. Sometimes because of your content [like bots,webcrawler,proxydomain] or for no reason)

5. Enter your email address inside the textbox, then click "Verify My Email Address"
(Im using temp-mail from getnada in this tutorial, if you keeps geting error 'A user already registered with this email address', use this email combination trick; number + anyname [e.g 01orangeju@mymail.com] to bypass that error)
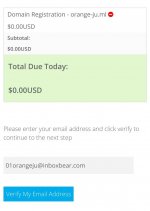
6. Now go to your email inbox and find Freenom's verification mail. Just copy the verification link then paste it to the browser's URL box you're using during Domain registration

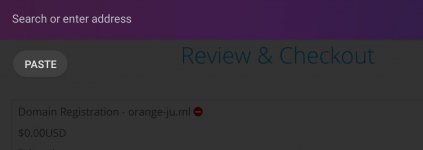
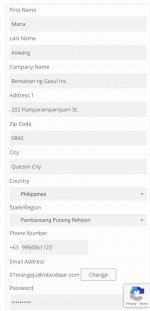
7. Now we're on freenom registration form. We need to fill up all info's accurate (Key is just paste all location info of our IP, that's why we logged ipinfo.io/json result) to avoid declined registration attempt. Copy the recent city,region and postal then paste all of it on the form. Country is Philippines,if region is Metro Manila, choose 'Pambansang Punong Rehiyon'
Invent some Mobile phone number(use correct prefix,search on google)
Address 1: combination must be random 3 or 4-digit + somename + St. ex: 202 Pamparampampam St.
First and Last Name: any name, must be referenced as a filipino name ex: Maria Aswang
Company Name: any combination with "Inc." and "Co. Ltd." at last part
Password: 8-to-16 alphanumeric combination with Uppercase and Lowercase. ex: 12TestExp or TestExp12
Example form:
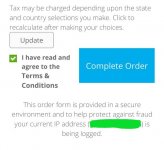
Then check the box below "I have read and agree to the terms".
and then click at the bottom part "Complete Order" button
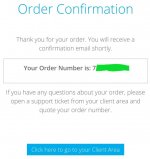
8. click "Click here to go to your Client Area" (If you received error "401 Autorization required", goto You do not have permission to view the full content of this post. Log in or register now. to relogin your account). You'll see your name in the page, scroll through the bottom of the page and click "You do not have permission to view the full content of this post. Log in or register now.".
- If your domain is missing on the page, that means you fail to register your domain (or system automatically suspend your domain registration)
9. click "Manage Domain" on your new domain
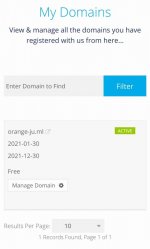
then click "Manage Freenom DNS".
10. you'll see a DNS management page. first long box is for subdomain/record name(like
- I will configuring the root domain here, remain empty the first longbox.
- Idea is we need to actively configure the root domain to help cloudflare recognize our domain easily. Just put any dummy ip that responses any HTTP status code to test if our domain can resolve ip address or not
11. we will just wait until our domain is active on the internet (Feeenom DNS servers are too slow for newly registered domain) goto You do not have permission to view the full content of this post. Log in or register now. to check our domain, offline domain responses "No such device or address" error
it takes about an hour to wait until online.
After waiting, active domain throws some responses like "Server error" or some "HTTP Status" codes (if You do not have permission to view the full content of this post. Log in or register now. is used)
12. Creating a CloudFlare account, if you already have a account, skip this step.
Goto You do not have permission to view the full content of this post. Log in or register now.
You can reuse your recent email address on your freenom account here. After fillup, click "Create Account". Do not fillup yet the "add site" textbox, just goto your email inbox and Find
13. On your dashboard; On new cloudflare account, simply click "Add site". On used cloudflare account, if you didn't find that button, goto your menu then click "Add site".
enter your domain and click again "Add site"
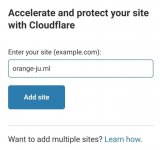
14. CloudFlare asks us to plan we want to use, just find the free plan $0 and click "Continue"

15. Wait for DNS scan to be complete, it will ask us to review our last DNS records, just click "Continue"
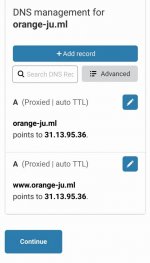
16. Copy the two Nameservers provided by cloudflare (note: nameserver may differ on other accounts)
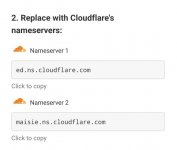
go back to your Freenom account (for firefox focus users, use some browser to open other site if new tab/multi tab is not supported) You do not have permission to view the full content of this post. Log in or register now. then Goto "My Domain" click your new domain and click "Manage Domain". Click on "Management Tools" then select "Nameservers". Tick the circle for "Use custom nameservers". Enter the two nameservers provided by CloudFlare
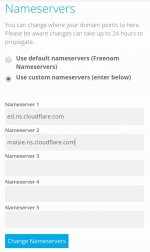
then click "Change Nameservers".
17. Go back to your CloudFlare account while we're waiting for Nameserver exchange for our domain, just wait 1 minute before clicking "Done, check nameservers" then click after 1minute.
- If some questions prompt about domain configuration, skip them (click "Finish it later")
Scroll down and find "Check Nameservers" then click it. After clicking, just Refresh the page
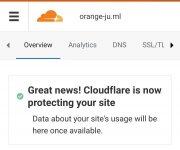
18. Now we successfully link our freenom domain to Cloudflare
# Optional steps below are just for security and optimizing features, you can skip them and proceed to linking your servers into your new domain
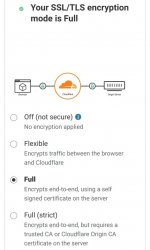
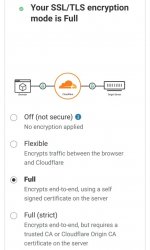
* [Enabling Full SSL/TLS Encryption] Go to your dashboard, Click a domain you want to enable that feature, Find and click "SSL/TLS" navigation on top of the page, and click "Overview", then tick the "Full" circle
* [HTTPS Only]: Goto your dashboard >> select a domain > SSL/TLS > Edge Certificates > Turn ON "Always Use HTTPS" and "Automatic HTTPS Rewrites"
Create free domain on Freenom + Connect them in cloudflare
Im also sharing my tips and tricks on:
- How to accurately create freenom account without errors
- Fast way to point freenom domain to your cloudflare account
Prerequisite:
- An active/valid email address (temp-mail is allowed)
- A clean/fresh browser (for tutorial accuracy)
- Connected to Philippine IP address (just use your prepaid data)
- A scratch notepad (QuickEdit,DroidEdit,etc. fast-access text editing app)
Im using Firefox focus browser in this tutorial
1. Open your browser, then go to You do not have permission to view the full content of this post. Log in or register now.
copy city, region and postal code then paste to your notepad (If you're foreign, find PH server and connect to them to follow properly this tutorial)
2. Close tab (in Firefox Focus, tap the Trashbin icon), go to You do not have permission to view the full content of this post. Log in or register now. "remove ()"
3. Think about your domain you want to register, make them unique so you don't have any problem about domain availability check. Then type in textbox your desired domain plus [.ml/.ga/.gq/.cf/(.)tk]
For example: orange-ju.ml
Press enter on your keyboard
Then click "Checkout" button
(If the site doesn't respond after you click a button, refresh the page and wait till site completely finsh to load)

4. After clicking 'checkout', you'll be redirected to Freenom cart page.
On Domain Period selection: Select only 11 Month (my experience from using 12-month free subscription is when you overuse it, they will suspend your account. Sometimes because of your content [like bots,webcrawler,proxydomain] or for no reason)

5. Enter your email address inside the textbox, then click "Verify My Email Address"
(Im using temp-mail from getnada in this tutorial, if you keeps geting error 'A user already registered with this email address', use this email combination trick; number + anyname [e.g 01orangeju@mymail.com] to bypass that error)

6. Now go to your email inbox and find Freenom's verification mail. Just copy the verification link then paste it to the browser's URL box you're using during Domain registration


7. Now we're on freenom registration form. We need to fill up all info's accurate (Key is just paste all location info of our IP, that's why we logged ipinfo.io/json result) to avoid declined registration attempt. Copy the recent city,region and postal then paste all of it on the form. Country is Philippines,if region is Metro Manila, choose 'Pambansang Punong Rehiyon'
Invent some Mobile phone number(use correct prefix,search on google)
9 + 2-digit prefix + random 7-digit . ex: 9994561123.Address 1: combination must be random 3 or 4-digit + somename + St. ex: 202 Pamparampampam St.
First and Last Name: any name, must be referenced as a filipino name ex: Maria Aswang
Company Name: any combination with "Inc." and "Co. Ltd." at last part
Password: 8-to-16 alphanumeric combination with Uppercase and Lowercase. ex: 12TestExp or TestExp12
Example form:

Then check the box below "I have read and agree to the terms".
and then click at the bottom part "Complete Order" button

- If you're declined, you need to clear browser data and change IP, also change your email, you need to back at the first step.
- If you receive "Shopping cart is empty" that means you take a long time in your registration form, simply copy and paste again your Email Verification URL link.

8. click "Click here to go to your Client Area" (If you received error "401 Autorization required", goto You do not have permission to view the full content of this post. Log in or register now. to relogin your account). You'll see your name in the page, scroll through the bottom of the page and click "You do not have permission to view the full content of this post. Log in or register now.".
- If your domain is missing on the page, that means you fail to register your domain (or system automatically suspend your domain registration)
9. click "Manage Domain" on your new domain

then click "Manage Freenom DNS".
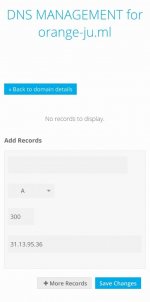
10. you'll see a DNS management page. first long box is for subdomain/record name(like
www or m); second selectbox is for record type (we will choosing 'A' for ipv4 record); third smallbox is TTL time, we will setting it to 3600 seconds; last fourth is for 'A' record value, probably a IP address. in my tutorial im using a Facebookspace IP address just for testing (31.13.95.36)- I will configuring the root domain here, remain empty the first longbox.

- Idea is we need to actively configure the root domain to help cloudflare recognize our domain easily. Just put any dummy ip that responses any HTTP status code to test if our domain can resolve ip address or not
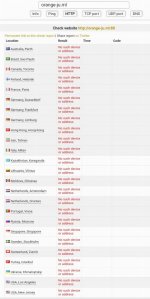
11. we will just wait until our domain is active on the internet (Feeenom DNS servers are too slow for newly registered domain) goto You do not have permission to view the full content of this post. Log in or register now. to check our domain, offline domain responses "No such device or address" error

it takes about an hour to wait until online.
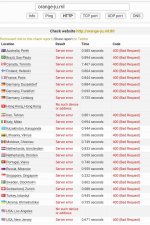
After waiting, active domain throws some responses like "Server error" or some "HTTP Status" codes (if You do not have permission to view the full content of this post. Log in or register now. is used)

12. Creating a CloudFlare account, if you already have a account, skip this step.
Goto You do not have permission to view the full content of this post. Log in or register now.
You can reuse your recent email address on your freenom account here. After fillup, click "Create Account". Do not fillup yet the "add site" textbox, just goto your email inbox and Find
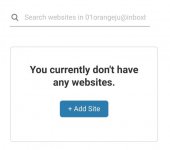
Cloudflare "Please verify your email address". Copy link and paste it to your browser URL. it will redirect you to a page and click "Continue to dashboard."13. On your dashboard; On new cloudflare account, simply click "Add site". On used cloudflare account, if you didn't find that button, goto your menu then click "Add site".

enter your domain and click again "Add site"

14. CloudFlare asks us to plan we want to use, just find the free plan $0 and click "Continue"

15. Wait for DNS scan to be complete, it will ask us to review our last DNS records, just click "Continue"

16. Copy the two Nameservers provided by cloudflare (note: nameserver may differ on other accounts)

go back to your Freenom account (for firefox focus users, use some browser to open other site if new tab/multi tab is not supported) You do not have permission to view the full content of this post. Log in or register now. then Goto "My Domain" click your new domain and click "Manage Domain". Click on "Management Tools" then select "Nameservers". Tick the circle for "Use custom nameservers". Enter the two nameservers provided by CloudFlare

then click "Change Nameservers".
17. Go back to your CloudFlare account while we're waiting for Nameserver exchange for our domain, just wait 1 minute before clicking "Done, check nameservers" then click after 1minute.
- If some questions prompt about domain configuration, skip them (click "Finish it later")
Scroll down and find "Check Nameservers" then click it. After clicking, just Refresh the page
18. Now we successfully link our freenom domain to Cloudflare

# Optional steps below are just for security and optimizing features, you can skip them and proceed to linking your servers into your new domain
* [Enabling Full SSL/TLS Encryption] Go to your dashboard, Click a domain you want to enable that feature, Find and click "SSL/TLS" navigation on top of the page, and click "Overview", then tick the "Full" circle

* [HTTPS Only]: Goto your dashboard >> select a domain > SSL/TLS > Edge Certificates > Turn ON "Always Use HTTPS" and "Automatic HTTPS Rewrites"
Attachments
-
You do not have permission to view the full content of this post. Log in or register now.
Last edited:

